Page 1 of 1
New Bike Build
Posted: 23 Nov 2010, 21:14
by othy
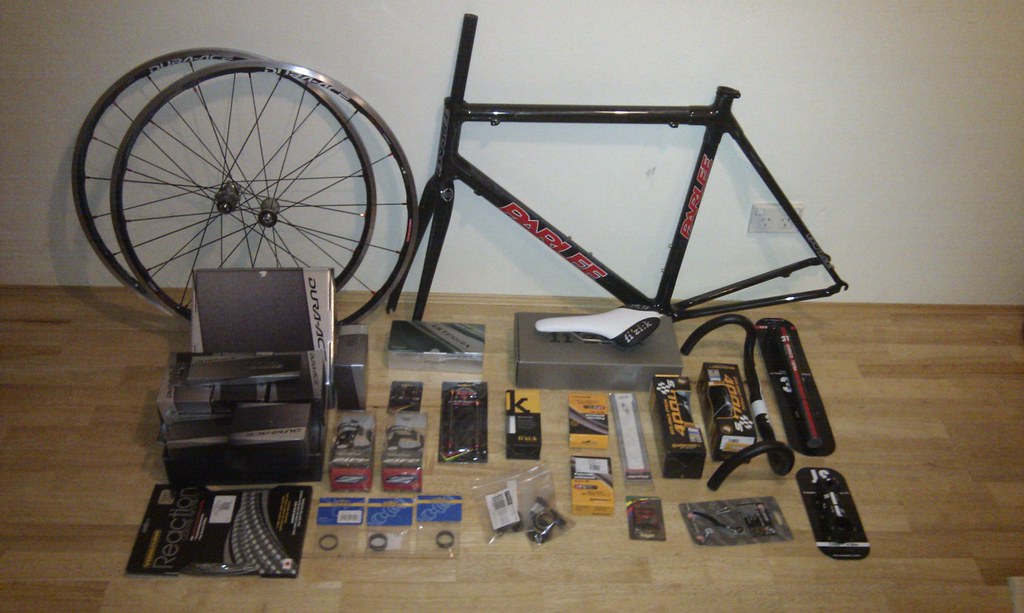 Parlee Z4 pieces
 by
othyb, on Flickr
So I have all the pieces and am about to embark on my first complete bicycle build. Thought I would start a thread where I can ask the many questions that are likely to arise from this.
First two:
1. Can I please borrow a Shimano BB tool from someone?
2. Where should I get the headset installed? The frame and fork are all carbon, I'd like someone who won't mess it up.
Re: New Bike Build
Posted: 23 Nov 2010, 21:24
by shrubb face
I'll bring my BB tool to the track tomorrow, its in my car ready to go. Which model fizik saddle is that one? ill be interested to find out if you like it or not.
Re: New Bike Build
Posted: 23 Nov 2010, 21:32
by othy
It is the Antares. I had it on a loaner bike in the USA and liked it. Little wider and shorter then the Arione which I have on several bikes. Thought I'd try something new, I can always go back to an Arione if I hate it after getting some extended time to ride it.
Thanks for the BB tool loan (again).
Re: New Bike Build
Posted: 23 Nov 2010, 21:53
by timyone
wow! looks like fun!!
Re: New Bike Build
Posted: 23 Nov 2010, 21:58
by T-Bone
Looks nice and light!!! I'm guessing the Ultegra is Pedals??
The Yokozuna cables are very nice to use, just make sure you've got something to protect the frame from cable rub.
Don't the 7900 Cranks come with the bottom bracket tool? The 7800 cranks always did.
Re: New Bike Build
Posted: 23 Nov 2010, 23:16
by othy
Looks nice and light!!! I'm guessing the Ultegra is Pedals??
The Yokozuna cables are very nice to use, just make sure you've got something to protect the frame from cable rub.
Don't the 7900 Cranks come with the bottom bracket tool? The 7800 cranks always did.
Yes should be light. You are right, Ultegra pedals are just until the carbon DA-7900 ones are released. I have Far & Near tube tops for frame rub + lizard skin patches.
No BB tool with the cranks..
Re: New Bike Build
Posted: 24 Nov 2010, 05:18
by Trouty
Very Nice Othy.
As it's carbon, if you need a torque wrench I have one you can borrow.
Re: New Bike Build
Posted: 24 Nov 2010, 06:55
by othy
Thanks Jo, but I've purchased a torque wrench. I figure I'll be needing one from now on whenever I make any adjustments.
Re: New Bike Build
Posted: 24 Nov 2010, 08:22
by mikesbytes
Mate your going to be flying
Re: New Bike Build
Posted: 24 Nov 2010, 08:56
by orphic
Very nice! I can lend you a bucket of drool if you require

Re: New Bike Build
Posted: 24 Nov 2010, 09:30
by weiyun
Don't forget assembly compound and/or grease. They can significantly improve contact and keep components in place without resorting to over-torquing. Otherwise it's grease at every interface to prevent CF-alloy welding.
Have fun!
Re: New Bike Build
Posted: 24 Nov 2010, 12:17
by mikesbytes
Your banned from riding that bike around the back of Darling Harbour
Re: New Bike Build
Posted: 24 Nov 2010, 12:41
by christian
I use never-seez on parts I know have a tendency to bind, or any bolt that is going into an insert in carbon. It should stop the dissimilar metal corrosion which is why some bolts are hard to get out. Its what we use on underwater enclosures and thats a much tougher environment than a bike. Also if the cranks are carbon be sure to use pedal washers as one of the reasons pedal can be hard to get off is the faces bind.
Other then that, its purdy. I'll have to post up pics of my new steed.
Re: New Bike Build
Posted: 24 Nov 2010, 12:52
by othy
I use never-seez on parts I know have a tendency to bind, or any bolt that is going into an insert in carbon. It should stop the dissimilar metal corrosion which is why some bolts are hard to get out. Its what we use on underwater enclosures and thats a much tougher environment than a bike. Also if the cranks are carbon be sure to use pedal washers as one of the reasons pedal can be hard to get off is the faces bind.
Other then that, its purdy. I'll have to post up pics of my new steed.
So the new MTB has arrived?
I have Tacx carbon assembly compound for seatpost / stem / handlebars and some bike specific grease for every other part & bolts. Yokozuna cables come lubed and its not recommended to use anything else in them. The cranks are just the standard DA-7900, so not carbon, though they are still very pretty.
Re: New Bike Build
Posted: 24 Nov 2010, 13:14
by christian
The never-seez is used on bolts it has nickel and graphite in it, it just stops them getting stuck through corrosion. The carbon assembly compound it to stop the parts slipping, which can be a problem with seat posts, just ask Alex, he resorted to super glue, I've used hair spray.
The new bike has arrived, but just my luck it has a problem with the rear shock and that part may have to head back OS, grrrrrrr. Thats the problem with importing stuff, even if it was a bike that wasn't available here at the time.
Re: New Bike Build
Posted: 24 Nov 2010, 21:09
by othy
As per the discussion at the track, I've done a little more headset investigation.
I have a Cane Creek IS type headset to install, instructions are here:
http://www.canecreek.com/manuals/Headse ... ctions.pdf
I think the only tool required is to install the crown race on the fork?
Re: New Bike Build
Posted: 24 Nov 2010, 21:38
by othy
Ok, so having read the instructions it suggests that the bearings should fit into the headtube with "little or no resistance". Not sure how little they mean - mine look like they'll go in but will need a push (by hand only), and don't look like they'll come out particularly easy. Is this normal?
Re: New Bike Build
Posted: 24 Nov 2010, 23:29
by T-Bone
Could just be tight tolerances on the frame, you can always rub a little grease around the bearing and see if that helps. If the push to get the bearings in seems excessive then you can always find a shop with the right tool to use a reamer on the bearing seats. Anyway, on a Parlee i'd expect it to be just tight tolerances to prevent any bearing movement.
I got a bike shop to install the crown race and headset (standard headset) last time i needed it done, though mainly because i decided i shouldn't do a bodgy job on a nice frame.
Are your forks Edge or Enve??
Re: New Bike Build
Posted: 25 Nov 2010, 07:33
by othy
The forks are Edge 2.0. Their manual says not to modify the fork when installing the race, so I should probably remind the bike shop of this when I get it installed.
The bearing tolerance just feels tight - I expect it will push in if I gave it a little bit of an even press with my thumbs.
Re: New Bike Build
Posted: 25 Nov 2010, 08:44
by shrubb face
You can install the crown race reasonably easily yourself. The actual tool is basically just a bit of pipe that fits over the steer tube and you use that to hit/push the crown race into position.
Re: New Bike Build
Posted: 25 Nov 2010, 10:56
by wallman
This might be a dumb question, but have you actually double-checked the fork to see if the crown race isn't already installed? When I bought the Cervelo from the US the frame came with the job already done, which I didn't realise until I'd opened the headset box and wondered where the crown race was...If you haven't seen a crown race installed before, prepare to be aghast(ed). As Alex said the shop will use a length of pipe and smash the hell out of the crown race to get it seated properly. Not for the faint-hearted.
Re: New Bike Build
Posted: 25 Nov 2010, 11:01
by timyone
sounds like hip sergery!
Re: New Bike Build
Posted: 25 Nov 2010, 11:07
by othy
This might be a dumb question, but have you actually double-checked the fork to see if the crown race isn't already installed? When I bought the Cervelo from the US the frame came with the job already done, which I didn't realise until I'd opened the headset box and wondered where the crown race was...If you haven't seen a crown race installed before, prepare to be aghast(ed). As Alex said the shop will use a length of pipe and smash the hell out of the crown race to get it seated properly. Not for the faint-hearted.
Unfortunately I'm not so lucky, I have the crown race piece here.
I think I'll cut the steerer myself too. So far what I've read suggests a fine tooth hacksaw, some hose clamps, masking tape, sandpaper and measuring twice seems to do the job. I'll give it a practice run further up the steerer to see how it goes.
Re: New Bike Build
Posted: 25 Nov 2010, 11:30
by christian
I have an old stem that I and everyone else uses to cut steer tubes, you can borrow it if you want. If you are going to do a test cut, buy two hacksaw blades, they don't last long cutting carbon.
Re: New Bike Build
Posted: 25 Nov 2010, 12:21
by orphic
If you do end up needing a crown race setter I think Geoff S might have one.
Re: New Bike Build
Posted: 25 Nov 2010, 14:20
by othy
Re: New Bike Build
Posted: 25 Nov 2010, 14:24
by orphic
Mmmm nice. Really, really... nice.
I hate you.
Re: New Bike Build
Posted: 25 Nov 2010, 15:17
by othy
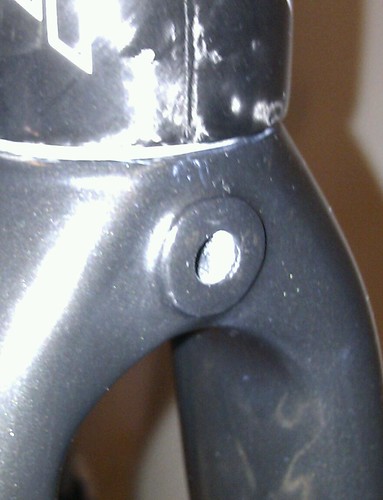
So I've run into my first puzzling part.
What is this concave washer on the front brake mount? Should I use it? Below it is the washer with teeth that grips the fork. None of my other bikes have this concave washer installed. Shimano documents don't seem to have any information as to what it is.
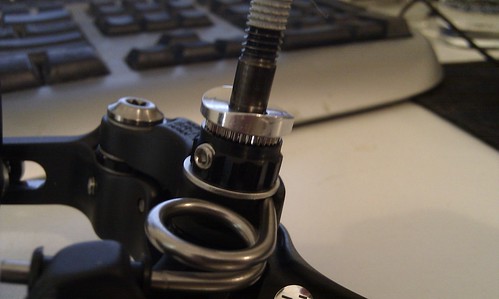
The fork mount, which it doesn't sit flush against:
Re: New Bike Build
Posted: 25 Nov 2010, 15:40
by othy
I suspect this piece is if the fork doesn't have a flat part to mount the brake against. I've left it out.
Re: New Bike Build
Posted: 25 Nov 2010, 16:05
by christian
Thats the type of washer you would expect to use on a round brake boss, but I've only seen them on the rear. I'd say its safe to leave it out.
Re: New Bike Build
Posted: 25 Nov 2010, 19:09
by Stuart
this is totally fascinating, even if I only understand about 25% of it. It looks really great Tim looking forward to seeing it out on the road. I assume the build it yourself thing is for personal satisfaction and skills building etc? Tell me, how much would a shop charge to build the bike? just interested.
Re: New Bike Build
Posted: 25 Nov 2010, 19:58
by othy
this is totally fascinating, even if I only understand about 25% of it. It looks really great Tim looking forward to seeing it out on the road. I assume the build it yourself thing is for personal satisfaction and skills building etc? Tell me, how much would a shop charge to build the bike? just interested.
Yeah, I just wanted to know how to put it all together. I try to do my own maintenance. Probably not the best bike to learn on being so high end, but I'm taking my time and being very cautious. A bike shop would charge anywhere between $150 - $300.
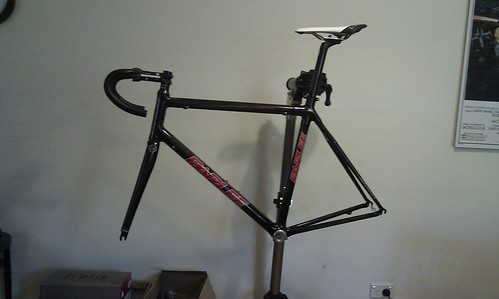
Here is how it looks at the moment:
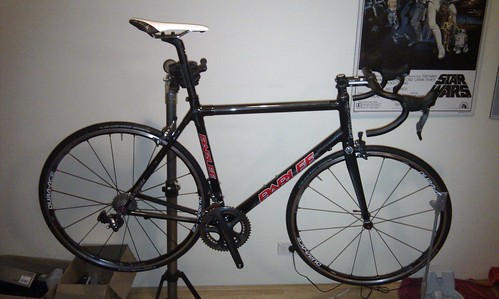
Getting there. Needs cables, chain, bartape and adjustments made.
Another question:
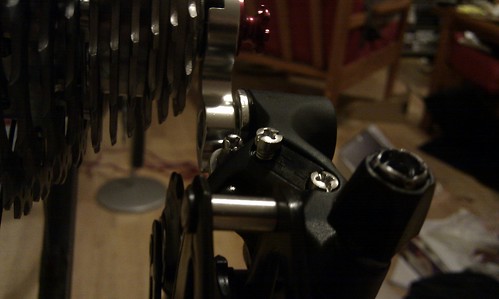
- I had to wind the H limit screw out a fair way to line up with the little sprocket. Anyone else experienced this? Still has a little way further but its pretty far out.
Re: New Bike Build
Posted: 25 Nov 2010, 20:14
by mikesbytes
Othy, this is serious bike porn
Re: New Bike Build
Posted: 26 Nov 2010, 11:15
by Toff
That H limit screw does not really seem too far out in my opinion. But then again, I know nothing about the components you are using Othy. I assume you will also be winding the B tension screw in much tighter, so your derailleur top pulley runs as close to the cassette as possible too.
I am also confused by that curved washer on your brake, especially if there was also one on the rear brake. Never seen it before on a front brake, and can see no need for it...
Re: New Bike Build
Posted: 26 Nov 2010, 12:25
by othy
That H limit screw does not really seem too far out in my opinion. But then again, I know nothing about the components you are using Othy. I assume you will also be winding the B tension screw in much tighter, so your derailleur top pulley runs as close to the cassette as possible too.
I am also confused by that curved washer on your brake, especially if there was also one on the rear brake. Never seen it before on a front brake, and can see no need for it...
Hi Toff,
You are probably right in that the H limit isn't that far out - I'm sure it will be fine as it seems like a component that once its set there probably isn't need for a huge range of adjustment.
I haven't set the B tension screw yet - well spotted.
The front brake washer is still confusing me - there wasn't one for the rear brake, and each were individually boxed. Doesn't matter now, I didn't use it when installing the brakes.
Re: New Bike Build
Posted: 26 Nov 2010, 12:36
by Toff
There is no chance that you may have confused the front brake with the back brake? Not trying to insult your intelligence, since it shouldn't be possible as the bolts should be very different lengths, but I've seen stranger things. Bikes on Ebay seem to turn up regularly with the brake pads facing backwards, and ready to pop out on first use!
Re: New Bike Build
Posted: 26 Nov 2010, 12:38
by christian
The position of the H and L screws are very frame dependent in my experience. If the screw hasn't fallen out then its not out too far. It will probably stop doing anything useful a few turns before it falls out anyway.
Re: New Bike Build
Posted: 26 Nov 2010, 12:44
by othy
There is no chance that you may have confused the front brake with the back brake? Not trying to insult your intelligence, since it shouldn't be possible as the bolts should be very different lengths, but I've seen stranger things. Bikes on Ebay seem to turn up regularly with the brake pads facing backwards, and ready to pop out on first use!
I did consider this, but really, the front brake bolt is way longer then the rear one. I'm not even sure if its possible to install them the wrong way...though I'm sure someone has managed it.
Re: New Bike Build
Posted: 26 Nov 2010, 15:49
by wallman
I am also confused by that curved washer on your brake, especially if there was also one on the rear brake. Never seen it before on a front brake, and can see no need for it...
Isn't it for mounting your brake to a curved fork surface, a-la the fork on my Fettucini?

Re: New Bike Build
Posted: 26 Nov 2010, 16:07
by weiyun
I did consider this, but really, the front brake bolt is way longer then the rear one. I'm not even sure if its possible to install them the wrong way...though I'm sure someone has managed it.
Bolt length may not be critical as one can, and often need to source nut of different length to suit the frame/fork.
Nice!
Re: New Bike Build
Posted: 26 Nov 2010, 16:54
by Toff
Isn't it for mounting your brake to a curved fork surface, a-la the fork on my Fettucini?
Wallman, the the brake on your fork is the older style which pre-dates the modern recessed allen key nuts of modern brakes. Yes, I have seen curved washers for those forks, but not for brake calipers that use recessed allen key nuts.
Re: New Bike Build
Posted: 01 Dec 2010, 10:06
by othy
I finished building it on Saturday night and haven't been out on it yet. Not going to be riding it in the rain, so this week looks like a write off.
Yokozuna cables are a bit of an exercise to get installed - hard to cut, used a dremel. Hard to route - used lots of cable ties, then had to wrap the bars in a lot of electrical tape. I ended up using the shifter ferules from the DA set as they recommend metal ones and the Yokos came with plastic. Also got a bit confused as the new 7900 brakes don't use ferules. All looking pretty good now. Worth the effort as they are very slick.
Still needs a few adjustments. I couldn't install the chain catcher because the braze on mount for it is incompatible with the collar that comes with the bike. Need to find a new spacer that doesn't have one side curved (or file it down - which is my current thinking).
B-limit screw seemed to do nothing. Haven't worked out why, can't see anything wrong.
Re: New Bike Build
Posted: 07 Dec 2010, 18:45
by othy
Was dry enough for the maiden voyage today - I couldn't wait any longer. Commute to work and back. I must have looked crazy with the massive grin on my face the whole way.
Re: New Bike Build
Posted: 08 Dec 2010, 07:12
by Lizanne
woohoo congrats!
and everything was working how it should?
Re: New Bike Build
Posted: 08 Dec 2010, 10:22
by othy
Yes everything is working. Runs very smoothly and so quiet. There was a creak from the saddle area on its first ride yesterday - fixed it last night though - turns out I'd forgotten to grease all the saddle bolts and the clamp bolt. No creak on the ride this morning.
I can't believe how fast it rolls. The DA-7850 wheels just glide along so smoothly and from my short rides feel far more aero then the 24mm rim would suggest.
Frame is stiff, but dare I say, compliant. I can't feel any flex climbing - I have a feeling the cranks + chainrings also contribute significantly to this.
One thing that has really stood out is the 7900 brakes. They are so precise and provide awesome control.
Front shifting is very quick.
Rear shifting is fast but much the same as my 5600 105 spec'd bike, though much quieter. The lever throws feel a little easier too, though this could be contributed to by the cables I used. I love the feel of the new hood shape so far.
Thats my initial quick impressions. I really need to take it out on a long ride. Very pleased at the moment, and learnt a lot during the process.